E7 | Carolina Comeback | Boulder Dash
Season 47 Episode 7 | 23m 42sVideo has Closed Captions
Jenn meets with the landscaper in North Asheville to install a retaining wall.
In Asheville, NC, Kevin O'Connor strolls through restored Biltmore Village and learns about its history and future. In East Asheville, Mauro Henrique guides Paula in cleaning and staining a fiberglass door. In North Asheville, Jenn Nawada and landscape architect Jennifer Verprauskus build a boulder terrace retaining wall. In Swannanoa, Kevin learns a new method to install an interior door.
Problems playing video? | Closed Captioning Feedback
Problems playing video? | Closed Captioning Feedback
Funding for THIS OLD HOUSE is provided by The Home Depot and Renewal By Andersen.
Support provided by:

E7 | Carolina Comeback | Boulder Dash
Season 47 Episode 7 | 23m 42sVideo has Closed Captions
In Asheville, NC, Kevin O'Connor strolls through restored Biltmore Village and learns about its history and future. In East Asheville, Mauro Henrique guides Paula in cleaning and staining a fiberglass door. In North Asheville, Jenn Nawada and landscape architect Jennifer Verprauskus build a boulder terrace retaining wall. In Swannanoa, Kevin learns a new method to install an interior door.
Problems playing video? | Closed Captioning Feedback
How to Watch This Old House
This Old House is available to stream on pbs.org and the free PBS App, available on iPhone, Apple TV, Android TV, Android smartphones, Amazon Fire TV, Amazon Fire Tablet, Roku, Samsung Smart TV, and Vizio.
Keep Exploring

This Old House Insider Newsletter
Get This Old House exclusive stories, tips, and behind-the-scenes information delivered right to your inbox every month.Providing Support for PBS.org
Learn Moreabout PBS online sponsorshipKevin: Today on "This Old House"... Mauro: I'll show you how to make this fiberglass door to look like wood with just stain.
Verprauskus: We're gonna do a terraced retaining wall and some drainage, some gravel backfill.
Kevin: And in Swannanoa, we are hanging solid-core...interior doors.
♪♪ ♪♪ Man: Ahh.
That's it.
♪♪ ♪♪ ♪♪ Kevin: Hey, there.
I'm Kevin O'Connor.
and welcome back to "This Old House" and to Western North Carolina, where we are working to help rebuild several homes damaged by Hurricane Helene.
Those houses are all in and around the city of Asheville, which is where I am today, and specifically in its historic Biltmore Village.
This centuries-old village was built at the base of the Vanderbilt estate and at the intersection of the French Broad and the Swannanoa Rivers.
A beautiful part of town, but one that was hit hard from the floods that came after Helene.
Many of the buildings were damaged, but as you can see, a lot of them are back, and that has brought a lot of optimism to this community.
So I thought I'd meet with a local architect and learn more about the history of this beautiful village, and also what he thinks the future is for this historic part of town.
So, Robert, a very nice vantage point of the village, even on a rainy day like today.
What's its history?
Griffin: The history of Biltmore Village was that it was basically built to order for George Vanderbilt.
He hired the architect Richard Morris Hunt and Frederick Law Olmsted to lay out the village... Kevin: Mm-hmm.
Griffin: ...to his direction, and he wanted to create a village that resembled a living working village like you might see in England.
Kevin: So it's immediately adjacent to the estate, but its purpose?
Griffin: The purpose was to create a focal point for something to grow from at the entrance to his estate.
So people who came on the train from New York were presented with the village.
Kevin: And the style of the houses are very distinctive.
Griffin: They are.
You know, we would call them English Tudor, but they have the jerkinhead roofs on a lot of gables.
Kevin: That's that very distinctive clip to the gable.
Griffin: Yeah.
And that softens the buildings.
Kevin: And between the half-timbering, on a traditional Tudor, I'm used to seeing a stucco much smoother.
This is a very distinctive look.
Griffin: Right.
The locals refer to it as pebbledash.
In England, it was called roughcast and it became pebbledash because you literally mix a slurry up of pebbles and concrete and slosh it up onto the wall.
Kevin: And this line of beautiful buildings and cottages right here -- I mean, these were never here.
Griffin: These were not.
And, uh, there were plans to develop houses.
Unfortunately, George Vanderbilt died in 1914, and the Flood of 1916 was devastating.
And after that, Edith eventually sold the village.
Kevin: Speaking of floods.
Griffin: Yeah.
Kevin: The Flood of 1916.
Griffin: Yeah.
Kevin: Worse or not as worse as Helene?
Griffin: Not as worse.
Kevin: Not as worse.
Griffin: No.
I know our property here is above the 500-year flood line and we flooded.
Kevin: How much water did these properties take?
Griffin: We got about 4 feet above grade.
Kevin: And how devastating to the rest of the village, which is lower from where we are?
Griffin: Yeah.
Many of those cottages, the water was up to the second floor.
Kevin: And what sort of renovations did you do to these buildings?
Griffin: We basically tore everything out to the dirt and started over.
Kevin: And I saw some original details, I think.
Griffin: Yeah, we were able to save a lot of the paneling and all the woodworking.
We did enjoy disassembling things and not wasting historic fabric.
I have to say, I'm very proud.
Our neighbors are going for it, you know.
Kevin: Just in love with the village, as well.
Griffin: Yeah, it's coming back.
Kevin: So you're optimistic?
Griffin: Not just optimistic.
Certain.
Kevin: All right.
Well, thank you.
And thank you for your help in saving the village.
Griffin: I appreciate your help.
Kevin: Pleasure.
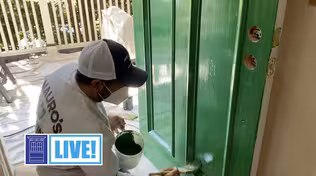
In East Asheville, Mauro is helping Paula stain a new door that replaced the one damaged by flooding.
Paula: Good morning, Mauro.
Mauro: Good morning, Paula.
Paula: I'm so glad you're here to help me with this door.
Um, I think I want to stain the whole thing.
Mauro: The whole thing?
Paula: Yeah, like, the whole outside of this and probably the inside, as well.
But it's made up of all these different pieces and parts.
Mauro: It's all different materials.
So we have the fiberglass here in the main door, a wood composite around the glass panel here, and you have this side panel.
Paula: Mm-hmm.
Mauro: Everything is gonna be stained on here.
Paula: Yeah, yeah.
And I'm worried that it's not all gonna look the same color.
Mauro: Well, you're gonna have a slight variation, but it's gonna look really cool.
Paula: Okay.
Mauro: All right.
Paula: And so I masked it out already.
And the door, you know, is here.
But this side light thing, I don't think it comes out.
Mauro: No.
It's just, like, one whole piece put together.
Paula: Yeah.
I think it's part of, like, the doorjamb.
Mauro: Yes.
We do need to take the door off the hinges, bring it inside, lay it flat on the sawhorses, and then we start to stain it.
Paula: Okay.
I think my contractors can help take it down.
Mauro: All right.
Sounds good.
Let's get started.
So we'll get all we need for materials, and we'll go to work.
Paula: Awesome.
Mauro: Okay.
Paula, ready to go to work?
Paula: I sure am.
Mauro: All right, the first thing that we have to do before any stain goes on this door -- We're gonna have to clean this door really well.
And we're going to use denatured alcohol, not water.
Paula: Why are we using that?
Mauro: Because it cleans better and dries very fast.
Just dip your rag right in there and we're gonna go like this.
Paula: Are we just wiping or are we scrubbing?
Mauro: We're doing both.
Look at this, Paula.
Paula: Oh, my gosh.
Mauro: First strike, look what we got.
Paula: Wow.
Mauro: Paula, the reason this dries really fast -- It's alcohol and it evaporates really, really fast, so... Paula: And it doesn't leave any residue or anything?
Mauro: Doesn't leave any residue.
All right.
What do you think?
Paula: I think it looks great.
You know, I think I've decided I want to stain both sides.
Mauro: Now that you see this side looks so good like this.
Paula: Yeah, it looks so good.
I didn't know it was gonna look like wood.
Mauro: All right, let's flip this door.
Clean the other side.
Paula: If a little stain gets on the window, I'll be able to clean it off?
Mauro: Absolutely.
Even when you're cleaning the door, always go with the grain.
All right?
Okay.
Paula, it looks really nice and it looks really clean.
Um, we're gonna have to take a little break until this completely dries.
Once you see the door, like this, looks dry, that means we'll be ready to stain.
♪♪ And then we're gonna use a gel stain.
♪♪ Uh, okay.
It's time to do some stain.
We've got the room well-ventilated, front door open, all the windows open.
But for acid safety, let's put some masks on.
So I want you to do all the inserts, okay?
Paula: Okay.
Mauro: You're gonna do one side, one side, and then your top coating.
And I'll take care of the big spots.
I'll start with this recessed panel.
Just when you're cleaned up, always go with the grain when you're applying the stain.
We're using a medium stiff brush.
I'm using a 2 1/2 angle.
And you are doing this, too, with a medium stiff, but yours is a 2-inch angle cut.
♪♪ Okay.
Door is completely covered with a coat of stain.
Let's take a break.
We'll wait about 30 to 45 minutes.
We'll come back.
We'll remove the excess.
But this time, we're gonna use a nice clean rag to smooth this thing out.
Once we remove all the excess, um, and it's dry -- I'm gonna wait about a couple more hours to dry completely... Paula: Mm-hmm.
Mauro: You're gonna apply... Exterior is spar urethane.
It's a water-base, drys relatively fast.
You may need two, maybe three coats.
Paula: I'll send you a picture when it's done, Mauro.
Mauro: I will wait for it.
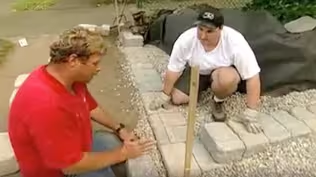
[ Paula laughs ] ♪♪ Kevin: In North Asheville, Jenn's meeting up with local landscape architect Jennifer to help build new boulder walls and learn about the landscape plan.
Jenn: Ooh, it's a beauty.
Verprauskus: Looks good.
Jenn.
Jenn: This looks perfect.
Verprauskus: That's an amazing specimen boulder.
Jenn: Absolutely.
I like how it hooks around.
Verprauskus: Yeah, it's like a perfect natural anchor point right into the slope.
Jenn: I really like it.
So what I want to do is refer back to your plan.
Now that we have the anchor piece in, let's go see what you have for the rest of the front.
Verprauskus: Great.
So this is the master plan of the entire property.
Jenn: Mm-hmm.
Verprauskus: Right now, we're focusing on the front.
So with this slope in mind, we want to do a terraced retaining wall.
We don't want to go high with a 4-foot wall.
That would make this feel very narrow and tight.
So what we want to do is two about-2-foot-tall walls.
And we're gonna be doing some drainage, some gravel backfill.
And then we're gonna add a second tier.
Jenn: I really appreciate this layout.
I love how it feels like a natural space, and that you're gonna have plantings in between these two boulder walls to separate it, giving it more space.
And then this whole grass area too, with the trees.
You know, everyone's a little bit nervous of having trees right near the house.
Right?
Verprauskus: When I first met with the homeowners, they tried to get grass growing here for a while, and they just couldn't make it happen because of all the tree canopy.
Jenn: Right.
Verprauskus: So now we're gonna allow more sunlight to come in and we can get more lawn established.
And I also wanted to do an island planting bed here so we could minimize our exposure from the road.
Jenn: Give it a little bit of privacy screen.
Verprauskus: Yeah.
And I did really try to focus on a lot of native plantings.
Jenn: Mm-hmm.
Verprauskus: I think one thing that's really important is introducing native species back into the environment after they were taken out by the storm.
Jenn: Right.
And obviously we're in the woods here, so put them back in their homes.
Verprauskus: Yep.
Mm-hmm.
Jenn: Well, I appreciate this.
So let's get moving to the next step.
Um, what do you think?
Drainage?
Verprauskus: I think that's really important.
Jenn: Okay, so behind all the walls, let's just go through what we're gonna do.
Verprauskus: Okay.
That's great.
Jenn: All right.
Verprauskus: So this pipe, it actually has holes in it to allow water to pass through, filtrate.
And then we have it sloped down with the natural grade.
And we have both pipes exiting that way.
Right?
So any of our water that's coming down this way will be taken care of.
Then what we're gonna do -- This is on a gravel base, and that perforated pipe sits on a gravel base.
And then we put more gravel on top of it to allow that water to come through.
Jenn: Exactly.
Verprauskus: Yeah.
And then this right here is our landscape fabric.
The reason why we use this is because I don't want sediment coming in and blocking.
Jenn: And clogging everything.
Verprauskus: Yeah.
Jenn: We do it the same way up north.
But next up, we need some more crushed stone.
♪♪ [ Beeping ] ♪♪ [ Beeping ] All right, ready for steps?
Verprauskus: Yeah.
I'll grab my tape measure.
Jenn: Perfect.
Okay, this is where the steps are gonna go, right?
Verprauskus: Absolutely.
Jenn: So before that, we need to move the fabric out of the way.
Verprauskus: Yeah.
So I'm gonna cut this right here so we can keep some fabric over the rock.
Jenn: And the purpose of keeping the fabric over the rock is, we have a second course to go on.
Verprauskus: All right.
So now we're gonna grab this edge and we're gonna wrap it.
Jenn: All right.
Verprauskus: And try to get it nice and taut.
Jenn: Yep.
Verprauskus: And then that way, this will come down later.
Jenn: Yep.
Verprauskus: And then we have room for our stone steppers.
Jenn: Perfect.
Verprauskus: Let's measure the opening.
We're looking at about 5 feet.
And we don't want them to be super-tight.
We want a little bit of room for movement when we set them.
Jenn: Okay.
Verprauskus: So I measured out about 4'7" inches of rock face.
Jenn: Okay.
Verprauskus: So let's set them in there.
Jenn: So we have two?
Verprauskus: Yeah, two.
Jenn: Perfect.
And then we can stick plants in and growth?
Verprauskus: Yes.
Like sedums and thyme.
Jenn: Let's go.
You want to pick out the finals?
Verprauskus: Yep.
Right up here.
Jenn: Yeah, that's the one.
Verprauskus: How many inches?
The other one was 28.
Jenn: 28.
Verprauskus: Okay.
Let's see if they match up.
♪♪ Jenn: Yep.
♪♪ Verprauskus: So, yeah, we're about 4'6".
Jenn: That should work.
Verprauskus: Okay.
Yeah.
Jenn: And then when we install it, just lift up that edge.
Verprauskus: Yep.
We'll put the gravel underneath it, lift it up, make it nice and tight.
Jenn: Sounds good.
Verprauskus: Okay.
♪♪ Yeah.
Jenn: Kind of on the money.
Verprauskus: Yeah.
It looks pretty good to me.
You ready for the next one?
Jenn: Yeah.
Verprauskus: Let's do it.
♪♪ ♪♪ Tip this one.
I want high under here for gravel.
Jenn: Yeah.
♪♪ Okay.
I think that's pretty good.
And then squish it together?
Verprauskus: Yeah.
And push them together.
♪♪ Jenn: That's pretty good, right?
Verprauskus: Yeah.
That's good.
♪♪ Good enough for now, I think.
Yeah.
Jenn: I like it.
The next step would be to put in the boulders as the second layer.
Ooh, what about this one?
Verprauskus: I really like this one.
Jenn: All right.
This one will be great next to the steps we put in as the beginning of the second course.
Verprauskus: Yeah, I think it's perfect.
[ Beeping ] ♪♪ All right, well, we got the second step in.
Jenn: It looks fantastic.
I can see how your design has the flow.
And I love the organic material.
All right.
So next step is the second course down here.
Verprauskus: Perfect.
♪♪ [ Hammering ] Kevin: Hey, Noah.
Good to see you again.
Noah: Hey, Kevin.
Kevin: How you doing?
Noah: Pretty good.
How are you?
Kevin: I'm doing all right.
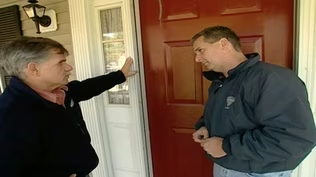
So, uh, today's task -- hanging doors.
Noah: Yeah.
Kevin: Nice turning point in the project.
Noah: We've got some pre-hung solid-wood five-panel.
Kevin: Okay.
[ Knocks ] Very nice.
And you got your rough openings here.
What is your process?
Noah: Well, I usually hang doors by myself, so I do a little different process.
But the first thing I want to do is clean up any Sheetrock that overhangs the framing.
The next thing I'm gonna do after we clean this up is, um, I'm gonna put shims at three places right underneath our hinges.
Kevin: And you're gonna do that right to the framing stud?
Noah: Correct.
Kevin: You get those, and I can clean up for you while you get that ready.
[ Vacuum whirring ] Noah: Yeah.
So this, uh -- This original door opening is a little bigger than our door.
So I'm just gonna pack this side out.
And then I'll -- I'll put my shims against this and level the shims.
So I've got about 3/8 of a gap here.
Kevin: Right there.
Noah: So I'm gonna start shimming at the bottom.
Kevin: Okay.
Noah: So I've got my 1/8 shims here and 3/16 here.
I can put these together in different combinations.
Hold what you got.
[ Nail gun firing ] Kevin: All right, Noah.
I've held my tongue long enough.
When we've hung pre-hung doors in the past, we have leaned them into the rough opening, and then we have come behind the hinges with shims so that we could screw through those.
You're not only putting your shims below the hinge spots, but you're also just doing this without even putting the door slab in.
Noah: So a lot of times on these hinges in the factory, the screws come out the back side of the jamb.
You can't slide them.
And this just alleviates all those issues.
Kevin: So you're working by yourself.
This is that workaround.
Noah: Exactly.
Kevin: And you're basically saying if I've got one plumb side and you know it's plumb... Noah: Yeah.
Kevin: ...now you can just set this in and work off of that.
Noah: Once I get the floor right.
Kevin: Ah.
That's what we're doing next?
Noah: That's next.
Kevin: Okay.
Noah: So this is a perfectly level line.
We measure down to the finished floor on each side.
12... and 12.
Kevin: Hey, look at that, huh?
Noah: It's great.
Kevin: So that's level.
You're good with that.
Had it not been?
Noah: Had it not been, I would take the smaller number, which would mean the floor is higher, and by the difference in these numbers, that's how much I'm gonna take off of that side of the jamb.
Kevin: So you would just go and, you know, theoretically just trim a tiny bit off of one side or the other... Noah: Exactly.
Kevin: ...so that when you put this in, you now know it is plumb on this side, level on the floor.
Noah: That's right.
Kevin: And with those two, you're good to... head off to the races.
Noah: We're good.
Kevin: All right.
Can we put this in?
Noah: Let's do it.
Let's pop the slab out.
Kevin: These are those screws you were talking about that come through the hinge out of the factory.
Shims coming in or out could get hung up on those.
Noah: Yeah.
Kevin: So you're going below it with shims.
This is your hinge side, right?
Noah: That's it.
Check it this way.
Okay, I'm happy there.
Let's pop some nails in it.
[ Nail gun firing ] And if I need to adjust it, these are just trim nails.
You can move them around... Kevin: Mm-hmm.
Noah: ...with a hammer.
Kevin: You are... plumb on both planes.
Nice.
Put the slab back in.
Noah: Yeah.
Let's just double-check that our reveal is good on the left side.
So from here, our casing, we'll measure it, and our casing will determine where this goes.
Kevin: So you're not going to infill this and plumb this right now?
Noah: No.
Kevin: Ooh!
You're just full of tricks.
All right.
Is this coming back out?
Are you gonna... Noah: Yeah.
Let's pull it.
So this is our casing material.
We want to keep a quarter-inch reveal... Kevin: All the way around.
Noah: ...all the way around.
So the first thing we can do is use this trilevel.
So we'll draw a line right here... all the way around.
Kevin: And then when we come back, we can set to the line.
Noah: Exactly.
Kevin: Beautiful.
Noah: Got our casing parts here, so we're gonna pocket screw the legs to the top.
Okay.
So another thing we like to do to our casing before we install it is, we'll take the biscuit joiner and we'll -- we'll cut some biscuit holes so that when we run our base, these biscuits will hold us flush and not get kicked back when we nail it.
Kevin: So just a nice way to line up your baseboard and your side casing.
Noah: Exactly.
Kevin: So you like to pre-assemble your casing, just like we did with the windows.
Noah: Exactly.
Kevin: Finish casing pre-assembled.
Noah: It keeps it all flat.
Okay.
[ Nail gun firing ] Kevin: Interesting.
Make the R.O.
plumb, set the jamb to it.
It's plumb.
Noah: Right.
Kevin: Bring the casing into the line.
It's plumb.
Noah: Yeah.
Kevin: And then you just work your way around.
[ Nail gun firing ] Noah: So I've got my 1/8-inch spacer here.
I like how that fits all the way across the top.
So I'm just gonna keep using it all the way down this.
And then... [ Nail gun firing ] Okay.
Kevin: Nice reveal all the way around.
Noah: Yeah.
So the last thing I like to do is throw one screw, full length, into our hinge.
Kevin: That is what's pinning that side of the jamb to your structure.
Noah: Yeah.
Kevin: The rough opening over there.
But none of this side of the jamb is pinned to the structure.
How do you feel about that?
Noah: It's fine.
It's floating.
And what keeps it in place is the casing.
So we'll have probably 10 -- or 5 nails on this side and five nails on this side holding the jamb to the casing, and then 10 nails holding it to the framing.
So between all that, this jamb isn't going anywhere.
Kevin: Locked it in.
So I have not hung a door this way.
So this is interesting.
Had I not been here, it would have been -- This would be the way you do it by yourself, to get rid of all that fussiness from either side with shims and all that?
Noah: That's right.
Kevin: It's on the list.
All right.
Thank you, Noah.
Well, that's it for us down here in Western North Carolina.
So until next time, I'm Kevin O'Connor.
Noah: I'm Noah Swaty.
Kevin: For "This Old House."
I am gonna have to report back to my people about this.
Noah: Okay.
Do it.
♪♪ Kevin: Next time on "This Old House"... So we're in downtown Asheville, also known as Beer City, and we couldn't resist coming to a brewery.
Cheers.
Man: Cheers.
Tom: So I hear you are measuring for some shades.
Woman: Yes, we're looking at an inside-mount blackout shade.
Oh, it looks so good.
Kevin: How do we get this prepped so it's gonna look as nice as the house across the street?
Mauro: That house looks great.
This is gonna look better.
[ Both laugh ] Game on!
Kevin: All right.
♪♪ That's next time.


- Home and How To

Hit the road in a classic car for a tour through Great Britain with two antiques experts.


Support for PBS provided by:
Funding for THIS OLD HOUSE is provided by The Home Depot and Renewal By Andersen.